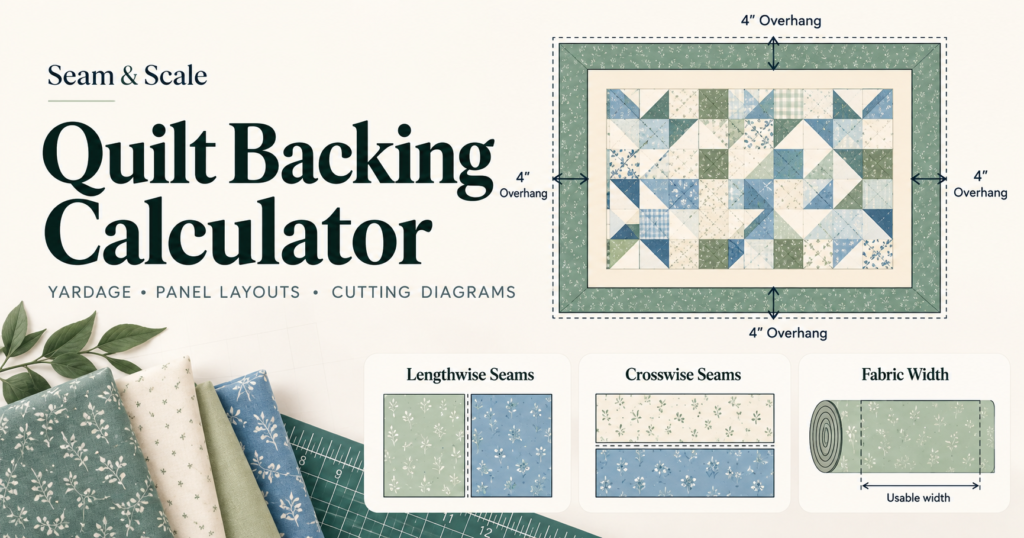
Calculating quilt backing takes more than multiplying your quilt’s length by its width. You need extra fabric around the quilt top, enough usable width after accounting for selvages, and room for the fabric consumed by backing seams.
Use the Quilt Backing Calculator above to estimate purchase yardage, compare lengthwise and crosswise seams, and view cutting and assembly diagrams before you cut. The result is a planning estimate based on your settings—not a guarantee that every fabric or print will behave the same way.
How Much Bigger Should Quilt Backing Be?
Backing should extend beyond all four edges of the quilt top. This extra fabric, often called backing overhang, provides room for basting, quilting, and—when applicable—loading and securing the backing on a longarm frame.
| Quilting method | Planning guidance |
|---|---|
| Domestic machine quilting | Some projects use about 2–3 inches extra per side; follow your method’s requirements. |
| Longarm quilting | About 4–5 inches per side is a common starting point; individual quilters may require more. |
| Professional quilting service | Use the specific backing dimensions requested by your quilter. |
These are guidelines, not universal minimums. Ask your quilter before buying fabric if someone else will quilt the project.
Example: Calculate the backing dimensions
Suppose your finished quilt top measures 61 × 81 inches, and you need 5 inches extra on each side.
- Backing width: 61 + 5 + 5 = 71 inches.
- Backing length: 81 + 5 + 5 = 91 inches.
Your target backing is 71 × 91 inches. Remember: “5 inches on each side” adds 10 inches to each overall dimension, not 5 inches.
Image: Quilt top and larger backing with the extra margin labeled on all four sides.
Bolt Width, Selvage, and Usable Fabric Width
The width printed on a fabric bolt is not always the width you can use in a backing seam. The finished factory edges, called selvages, can be firmer or more tightly woven than the rest of the cloth. Exclude the selvages from edges you plan to join, along with any other unusable edge area.
If a piece of fabric measures 42 inches across and you exclude 1 inch from each edge, you have:
42 − 1 − 1 = 40 inches of usable width.
That is only an example, not a rule that every 42-inch fabric loses exactly 2 inches. Measure the fabric you have—or use a conservative estimate if you have not bought it yet.
The calculator’s fabric presets are labeled usable (measured). Select a preset only when it matches the width you actually expect to use; otherwise, enter a custom usable width.
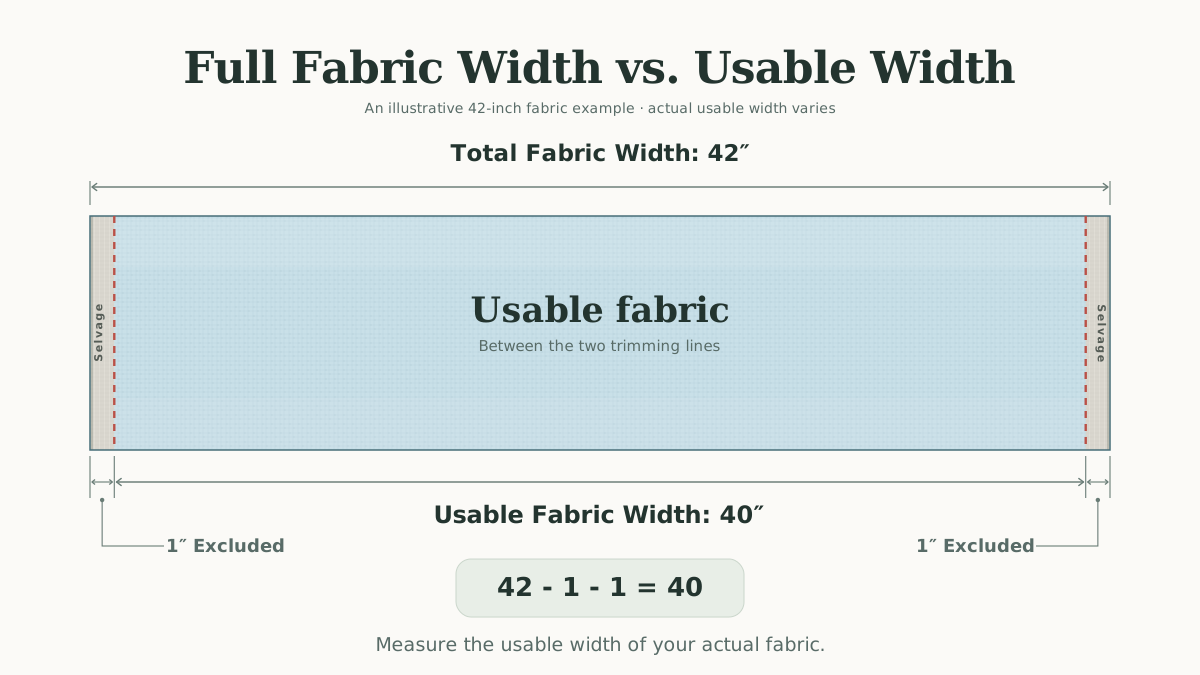
Image: Full fabric width, selvages at both edges, and the usable width remaining between them.
Why Backing Seams Change the Calculation
If one fabric panel cannot cover the required dimension, you may need to sew panels together. Each seam consumes fabric, so the joined width is smaller than the sum of the original panel widths.
The calculator defaults to a ½-inch seam allowance on each joined edge, a commonly recommended approach for pieced quilt backing. This differs from the ¼-inch allowance many quilters use when assembling quilt-top blocks. Follow your quilter’s instructions if they request another backing seam allowance.
Two-panel example
Two panels, each 42 inches usable, start with a combined width of:
42 + 42 = 84 inches.
A ½-inch allowance on each joined edge uses 1 inch across the seam:
84 − 1 = 83 inches of joined coverage.
That is sufficient for a backing requiring 71 inches of width, but not for one requiring 83.25 inches. Being off by a fraction of an inch can change the number of panels you need.
For equal-width panels, the general calculation is:
Joined coverage = (panel count × usable width) − ((panel count − 1) × 2 × seam allowance per edge).
The calculator accounts for this loss when determining the panel count for each orientation.
Lengthwise vs. Crosswise Backing Seams
The seam direction tells you how the panels are arranged on the finished backing—not which layout is automatically right for every quilt.
Lengthwise seams
Panels run along the quilt’s length and are joined side by side. With a target backing of 71 × 91 inches, this arrangement uses panels cut long enough to cover the 91-inch dimension.
Crosswise seams
Panels run across the quilt’s width and are joined end to end to build up the backing’s length. For the same 71 × 91-inch backing, this arrangement uses panels cut long enough to cover the 71-inch dimension.
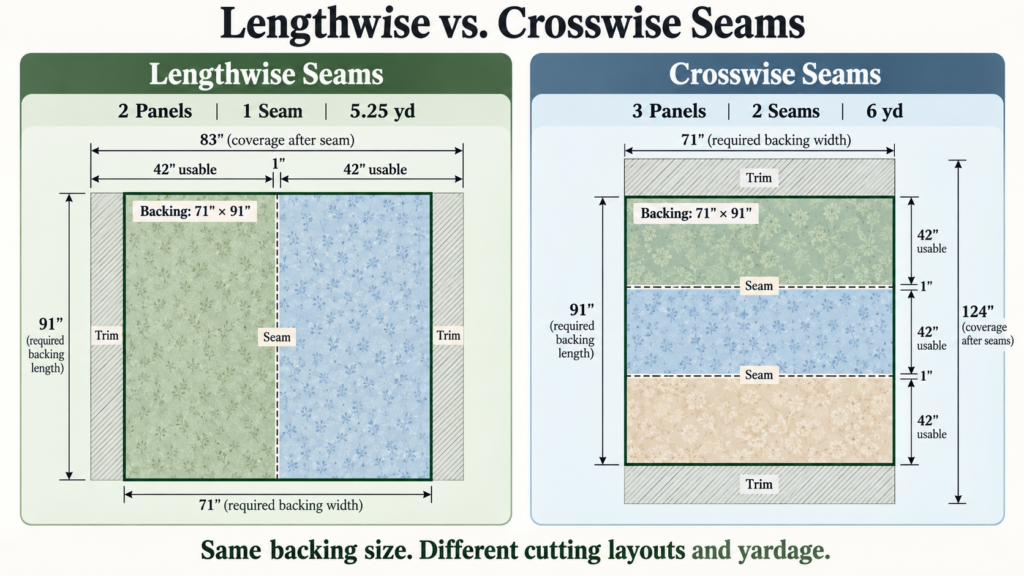
Image: Side-by-side lengthwise and crosswise backing layouts, with seams and panel directions labeled.
Which layout should you choose?
Compare the required yardage and the practical constraints of your project:
- Usable fabric width: Determines how many panels fit across the required dimension.
- Seam allowance: Reduces the coverage after panels are joined.
- Print direction: A rotated layout may turn trees, lettering, or other motifs sideways.
- Professional quilting requirements: Your longarm quilter may have a preferred seam direction or seam placement.
- Pattern matching: Matching large repeats can require additional fabric beyond the basic cutting estimate.
The Least purchase yardage setting compares the eligible layouts. You can instead choose Seams lengthwise, Seams crosswise, or Fewest seams. If your fabric must face a particular direction, use Keep print along quilt length; the calculator will exclude its incompatible crosswise option rather than silently rotate the print.
If your longarm quilter requests a particular seam arrangement, follow that instruction even if another layout uses slightly less fabric.
Worked Example: Backing for a 61 × 81-Inch Quilt
Let’s calculate both seam directions with these settings:
| Setting | Value |
|---|---|
| Quilt top | 61 × 81 inches |
| Extra on each side | 5 inches |
| Target backing | 71 × 91 inches |
| Usable fabric width | 42 inches |
| Seam allowance | ½ inch per joined edge |
| Expected prewash shrinkage | 0% |
| Extra for squaring each cut | 0 inches |
| Additional purchase buffer | 0 inches |
| Shop purchase increment | ¼ yard |
Lengthwise layout: Two panels
Two 42-inch panels joined with a ½-inch seam allowance per edge provide:
42 + 42 − 1 = 83 inches of coverage.
That covers the required 71-inch backing width. Each panel needs to run along the 91-inch backing length.
- Total length from the bolt: 2 × 91 = 182 inches.
- Exact calculated requirement: 182 ÷ 36 = 5.056 yards.
- Rounded up to the next ¼ yard: buy 5.25 yards.
Crosswise layout: Three panels
Two joined panels provide only 83 inches, which is not enough to cover the required 91-inch dimension. Three are needed.
Each panel runs across the 71-inch backing width:
- Total length from the bolt: 3 × 71 = 213 inches.
- Exact calculated requirement: 213 ÷ 36 = 5.917 yards.
- Rounded up to the next ¼ yard: buy 6 yards.
| Layout | Panels | Seams | Purchase amount |
|---|---|---|---|
| Lengthwise | 2 | 1 | 5.25 yd |
| Crosswise | 3 | 2 | 6 yd |
For these particular measurements and settings, lengthwise piecing saves ¾ yard. This does not mean lengthwise seams are always the more efficient or suitable option.
How to Read the Cutting and Assembly Diagrams
The calculator provides two visual views for a reason: cutting the fabric and joining the panels are different steps.
Cutting layout: Before assembly
The cutting diagram shows how the calculated panel lengths fit into the fabric purchased from the bolt.
In the example above, the lengthwise layout needs two 91-inch panel lengths. Buying 5.25 yards gives you 189 inches of bolt length:
189 − (91 + 91) = 7 inches remaining.
That figure is the remaining purchased length under the example’s zero-buffer settings, not a promise that 7 inches will remain after every real-world preparation step.
Assembly layout: After joining
The assembly diagram shows where the panels and seams go, how much coverage they provide, and where the quilt top fits within the backing.
Two 42-inch panels joined using the default seam allowance provide 83 inches across. For a target width of 71 inches, the extra assembled width is:
83 − 71 = 12 inches.
This excess can be trimmed according to the cutting plan. Confirm your actual sewn measurements before trimming.
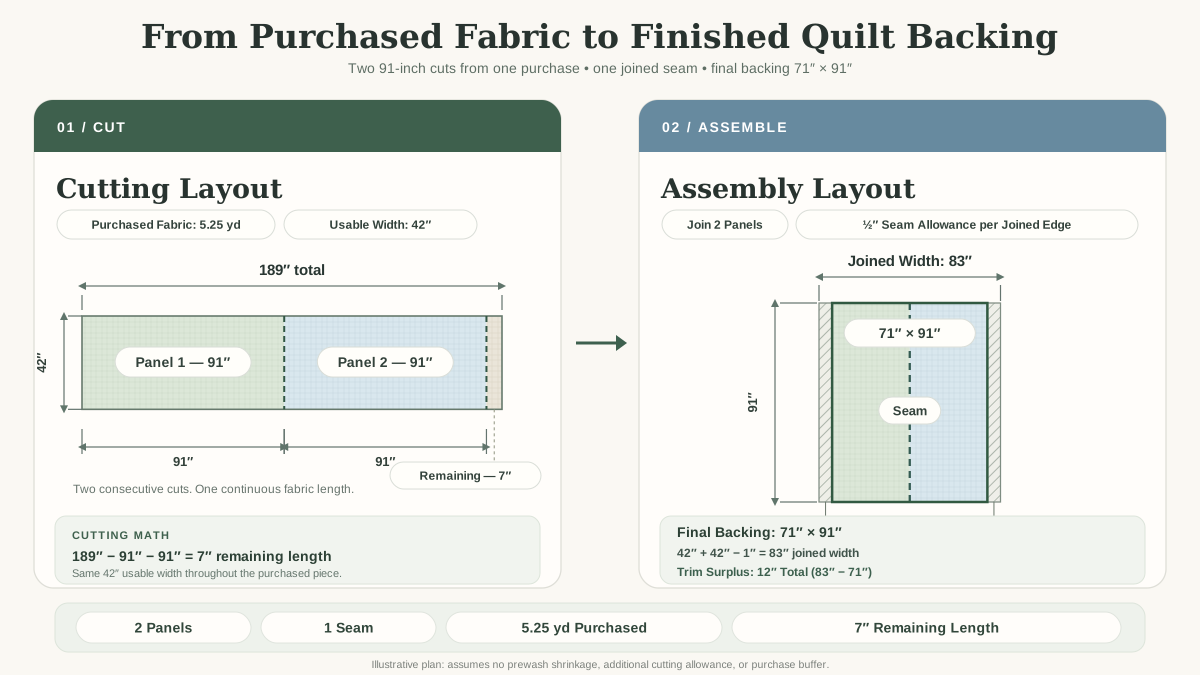
Image: The same project shown in two steps—a continuous bolt-length cutting plan and the finished backing panel assembly.
If you enter expected prewash shrinkage, the cutting diagram is a purchase-planning allocation before washing, not an instruction to cut the unwashed fabric at those marks. Prewash, remeasure, and then make your final cuts.
Should You Buy Standard-Width or Wideback Fabric?
Wideback fabric, often sold in widths around 108 inches, can sometimes cover a backing in one piece. This eliminates long backing seams and may save preparation time.
For the example’s 71 × 91-inch target backing, a genuinely usable 108-inch width covers the 91-inch dimension. You would then buy enough bolt length for the other dimension, plus any selected allowances.
However, 108-inch wideback does not fit every quilt without piecing. Check the required backing dimensions after adding overhang, and compare total costs: fewer yards does not automatically mean a lower fabric bill if the wideback costs more per yard.
Allowances That Can Change the Yardage
The calculator includes settings for common reasons you might need more fabric than a bare minimum calculation suggests.
Expected prewash shrinkage
Fabric may shrink during washing. The calculator uses your entered percentage as an estimate in both fabric directions. Actual lengthwise and crosswise shrinkage can differ, so do not treat the result as a guaranteed post-wash measurement.
If your fabric is already prewashed, measure its current usable width and enter 0% for expected prewash shrinkage.
Extra for squaring each cut
An uneven store cut or a fabric edge that needs straightening may require additional length. Use this setting to allow extra material for preparing each panel, rather than assuming the purchased edge is perfectly straight.
Additional purchase buffer
This is extra fabric beyond the calculated panel allocation. Consider it when you need room for a large pattern repeat, uncertain shop cuts, or another project-specific constraint. The calculator does not automatically calculate pattern-repeat matching; you must estimate the extra amount needed for your particular print.
Shop purchase increments
Select the amount in which your fabric shop sells yardage or meterage. The calculator rounds the purchase requirement up to that increment; the rounded figure may therefore be greater than the exact calculated panel length.
Checklist Before Cutting Quilt Backing
- Measure the actual completed quilt top.
- Confirm the overhang needed for your quilting method or longarm service.
- Measure or conservatively estimate usable fabric width.
- Decide whether you will prewash, and set shrinkage accordingly.
- Check the print direction and whether motifs must match across seams.
- Confirm your backing seam allowance.
- Compare both seam layouts and any quilter-specific requirements.
- Add allowances for squaring or buying extra if needed.
- Review the cutting and assembly diagrams.
- If prewashing, wash and remeasure before making the final cuts.
Frequently Asked Questions
How much bigger should quilt backing be than the quilt top?
The backing should extend beyond every edge. Around 4–5 inches per side is a common longarm starting point, but the correct amount depends on the quilter and loading method. For domestic quilting, some projects can use less. Confirm your project’s requirements rather than relying on one universal minimum.
Should backing seams use a ¼-inch or ½-inch seam allowance?
A ½-inch allowance on each joined edge is a commonly recommended approach for pieced backing, while ¼ inch is familiar from quilt-top piecing. The calculator defaults to ½ inch per edge and lets you change it if your quilter specifies something else.
Can I use 108-inch fabric without piecing?
Yes, when the fabric’s usable width covers at least one required backing dimension and the purchased length covers the other. A quilt with both required dimensions wider than the usable fabric cannot be backed with one piece of that fabric.
What if my fabric has a directional print?
Choose Keep print along quilt length if the motifs must retain that direction. Do not assume that a yardage-saving rotated layout is visually acceptable. Matching motifs across seams may also require extra fabric.
Why does the calculator round my yardage up?
Fabric shops sell in increments. If you need 5.056 yards and the shop sells in quarter yards, you must buy 5.25 yards to meet or exceed the calculated requirement. Rounding does not replace any shrinkage, squaring, or pattern-matching allowance you may need.
Should I prewash backing before cutting?
That depends on your fabric and project. If you choose to prewash, allow for possible shrinkage, follow the fabric’s care instructions, and remeasure before cutting. If the fabric was already washed, enter its measured usable width and set expected shrinkage to 0%.
What comes after preparing the backing?
The backing is layered with batting and the quilt top, then the layers are quilted and trimmed. The final outer edges are finished with binding. Use the Quilt Binding Calculator to plan that last step.
Write a review